Hard Disk partitioning is the process of splitting the storage space into 2 or more logical units. Partitioning a hard disk has many advantages. One of the best things is that you can prevent data corruption.
Must-See: How To Delete WhatsApp Backup from Google Drive
When your operating system is failed, you can safely copy your data from other drives if you've previously created a hard disk partition. Make sure that you put your important files and folders in the new partition.
Normally, people won't create a separate partition after buying a Windows laptop or desktop system. Windows PC has a built-in partition manager where you can create, merge and delete a partition. Many people are afraid of touching the disk management tool. If you're unsure about this, click on Start > Run > diskmgmt.msc
Must-See: Computer Shortcut Keys from A to Z and their Functions
Must-See: Computer Shortcut Keys from A to Z and their Functions
The only con I noticed in the built-in partition manager is its user interface. It is old-fashioned showing less clarity on partition features.
Today, I'm going to introduce an awesome partition software specially designed for Windows PC. It is named AOMEI Partition Assistant.
Requirements
- Windows PC (XP/Vista/7/8/8.1/10).
- AOMEI Partition Assistant (Standard/Professional Editions).
- Minimal space in your hard disk.
How To Partition Hard Disk In Windows 7 Without Formatting
By using the AOMEI Partition Assistant tool, you can easily change partition size in seconds. You can also extend, resize, shrink and delete partitions at your convenience by following a few steps.
- Download Free Partition Manager from their official disk partition website.
They provide both free and pro version partition software. The Standard edition is freeware.
Features of Pro Edition
- 24*7 VIP customer support service.
- You can recover the lost partition space.
- It allows you to migrate OS to SSD.
- Allows conversion between MBR and GPT.
Master boot record (MBR) disks use the standard BIOS partition table. GUID partition table (GPT) disks use the unified extensible firmware interface (UEFI). One advantage of GPT disks is that you can have multiple partitions on each disk.
Get Started
Once you've download AOMEI Partition Assistant,
- Right-click and Run as Administrator.
- Buy the Pro version or continue with the Standard edition.
- Accept the license agreement and install the software.
- Launch the application.
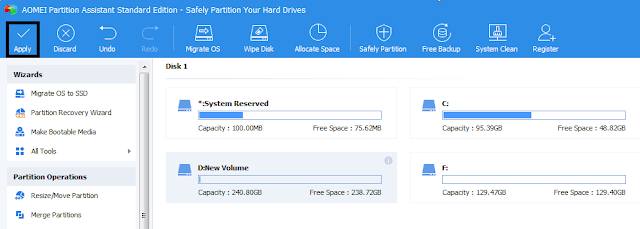
You'll love the clean UI of this software.
In my case, I chose D drive for the partition. The D drive has few files and folders with more free storage.
To Make a Partition,
- Right-Click on the specific drive.
- Click Create Partition.
Create Partition window will open.
- Click and drag on the Greenspace from left to right to specify the size for creating a new partition.
- You can change the Drive Letter too.
- Instead of dragging, you can also adjust the partition using the New Partition Size option.
- Now, click on the Advanced button.
- If you'd like to install Linux OS in the new partition, you should change NTFS to FAT32 before creating the partition.
- Click the OK button.
On the main interface window,
- Preview the disk space.
- Click on Apply option as shown below:
Your new partition will be created without formatting the existing data.
To Merge Partitions,
- Right-Click on the selected drive.
- Click Merge Partitions.
On the next windows,
- Check the disks you want to merge.
- Merge the selected partition with the targeted partition. Example: C drive as shown above.
- Then, click on OK.
The partitions will be merged successfully.
To Delete Partitions,
You'll see two options. They are:
1. Delete partition quickly (delete partition without wiping data).
2. Delete the partition and wipe data on it.
You have to check any one of the radio buttons whichever is essential for you.
- Finally, click on OK.
Now, you've successfully deleted the selected partition.
Note: The System Reserved disk should remain untouched. If you delete this partition, Windows won't boot when you start your computer.
Must-See: How To Delete WhatsApp Backup from Google Drive
Conclusion
AOMEI Partition Assistant is an excellent computer management tool for Windows 7. The free version comes with a certain limitation. Other tools like dynamic disk converter and SSD secure erase wizard are locked in the free version. In the Pro version, you'll also have the access to split partition, allocate free space, partition extend, and recovery wizard.


