Gmail is the most popular free email service which is owned by Google. Normally, important emails will be received in the Inbox > Primary section. Social and Promotional emails will be received in separate categories.
If you read all the emails in the Primary section, you'll come across personal and business purpose emails. Later, if you want to look for all the personal or business emails in one place, you should use the Gmail labels feature.
Must-See: How To Snooze Email in Gmail
Gmail has the labels feature which is helpful to organize your emails. By assigning a label to an email, you can always read the email anytime by going to the particular label. It is similar to labeling books in a library.
Creating a label doesn't mean creating a folder in Gmail. It's a folder-like section for your convenience to sort the types of emails. If you create multiple labels, it would be easy for you to check and finish your job at the right time. For business people, labels can help to finish the pending tasks quickly.
When you delete a labeled email from the All Mail folder, it will also erase those emails from the specific label.
Requirements
- A Gmail account.
- Desktop PC.
Get Started
You can create labels in Gmail only on the desktop version. As of now, the Gmail app lacks this feature. You can able to move emails to a specific label in the Gmail app. So, Android and iPhone users must use your web browser to create labels in Gmail.
Let's see how to do this now.
- Log in to your Gmail account.
On the left pane, you'll see the menu containing inbox, starred, snoozed, sent, and so on.
- Scroll down and click on More.
- Scroll down further and click on + Create New Label.
- Give a name to the Label. Example: Personal. (Give the label name in the first field stating, "Please enter a new label name").
- Leave the second field empty and don't check the box for Nest label under:
- Proceed further by clicking the Create button.
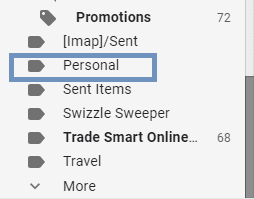
Now, we've created a label as shown below:
To Move Emails to a Label,
- Go to your inbox.
- Click the checkboxes for the corresponding emails.
- Click on the Move to (Arrow inside a folder) icon as shown above.
- Move the emails to the created label by clicking the label name.
If you've created multiple labels, you can search for the label in the search box.
The emails have been successfully moved to a concerned label.
How Do I Delete a Label in Gmail
Assume that you've created a lot of labels. Now, you want to remove labels to avoid confusion. Deleting a label is as simple as creating one. Basically, there are there methods to delete a label in Gmail. We'll see all three options one by one. Follow the below guide:
Method 1: To Delete an Individual Label,
- Find the label in the left pane that you need to remove.
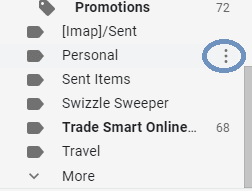
- Place the cursor on the label.
- Click on the 3 Vertical dots as shown below.
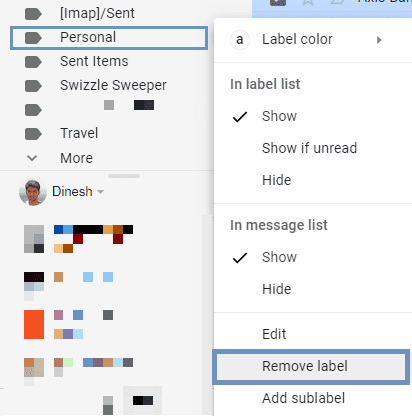
You'll see options like show/hide labels.
- Click Remove label.
- Click the Delete button for removing the label.
The label has been removed successfully using this very simple method.
Method 2: To Manage All Labels,
If you'd like to manage all the labels in one place, follow these steps.
On the left pane,
- Scroll down to the end.
- Click Manage Labels (Gear icon).
- Scroll down and find your custom label under the Labels category.
- Here, you can show/hide/remove/edit all the labels. You can change the name of the label by using the Edit option.
Method 3: Alternative Way to Manage Labels
To browse and manage all the labels,
- Click on the Gear icon.
- Go to Settings.
- Click on the Labels category which is next to the General category.
Here, manage all your labels effectively.
Note: When you delete a label, it won't delete the emails stored in the label. You can find the missing emails by checking the All Mail folder.
Conclusion
It's the manual process of moving emails to specific sub-folders (labels). If you're a busy person, you should use the Gmail filter to move the emails automatically to the corresponding labels.


